If this is your first visit, be sure to check out the FAQ by clicking the link above.
You may have to register before you can post: click the register link above to proceed.
To start viewing messages, select the forum that you want to visit from the selection below.
★ BabyQuad ★ PERRY THE PLATYPUS ★ Ern's Fave ★ dangerous with brooms ★
Legend entered the Workshop ready for another day of building. He had done the hard stuff yesterday so hopefully this day would go way smoother. Plus, he also was used to the tools. Making his way over to his bench he opened his notebook and looked at the next step.
SPOILER!!: Page 5
1. Prep the Area 2. Frame the Bench 3. Construct the Front Section 4. Double the Front and Back Support
5: Install the Bottom Supports
6. Attach the Plywood Sides
7. Attach the Top Piece
8. Attach the Strap Hinges
9. Attach the Trim
Step 4: Double the Front and Back Support
Attach another 2x4 to the front of the back support, effectively doubling it up. Screw a 2x4 flat against the bottoms of the upright pieces on the back and right side.
That was all? That was pretty easy. He was just doubling up the top part of the frame so that it would be stronger...and technically it wouldn't be considered a frame now would it? Grabbing his already cut wood and the drill Legend began to follow the instructions.
It was a little harder to actually drill this one in because he had to make sure the didn't go through two pieces of wood but that it was also in tightly. If it wasn't it would juts fall apart. Luckily though he only had to do this for four pieces of wood and it definitely wasn't as hard as yesterdays work. In a matter of ten minutes he was done.
Legend grabbed the mesuring tape, ready for the next part.
__________________
{act like you know me, but you never will}__{but there's one thing that I know for sure} {i'll show you}
Last edited by Kissing.Doves; 07-18-2010 at 08:14 PM.
Super Slytherin Buddy | | ⅓ She-Snake Trio | | a normal girl with normal knees
Grimacing at the too large of a hole in the wood, Evelyn sighed and just decided to go with it. There was no way she was restarting it now. Taking the drill one more, she gently held the end part against the wood, slightly nervous in pre-drilling another small hole in the wood. Alright...
zzzzzzzzzzzzzzzzzzzzzzzzzzzzzzzzzz
Alright, this was better.
Finishing up pre-drilling the holes in each piece of wood, Evelyn thankfully placed the drill down...faaarrrr away from herself since she wasn't going to be using it anymore. The hammer would just be its replacement. Glancing at the instructions and crossing off the steps she did, it now looked like she was ready to assemble the house!
YES!
Taking the wall divider wood piece and bringing the bottom piece close to her, the Slytherin had made sure that she knew where she was going to be placing the nails in the wood before actually doing so. She did not want to have to work on this part for the next half hour, so she was going to be doing it RIGHT. Having made the pre-drilled holes a little bit deeper then the others so she knew where to place the wall divider, Evelyn stacked the bottom piece on top of the wall piece, holding the hammer in one hand, and a nail in the other.
So, now to just...line it up...and then gently tap it in first....
TAP TAP TAP TAP TAP
Aaaand, now the nails stood on its own! Pffft, and Lawson probably thought she hadn't paid any attention during the class. Yea, she totally just showed him! No matter how stupid the victory was, she would take it! She wasn't done yet though.
BAM BAM BAM BAM BAM BAM!
Nooooow the nail was stuck in there. And it wasn't sticking out on the other side either. MWAHAHA! This stuff was EASY! Who cares what she thought earlier, this muggle stuff was a cinch.
SPOILER!!: Niffler House Plans
Niffler House
Step 1: Gather tools and things needed.
- 7 pieces of good sturdy wood. (will cut to size later)
- 1 saw
- 1 power drill
- 1 hammer
- Nails
- Glue
- Two hinges
- 1 ruler/yard stick
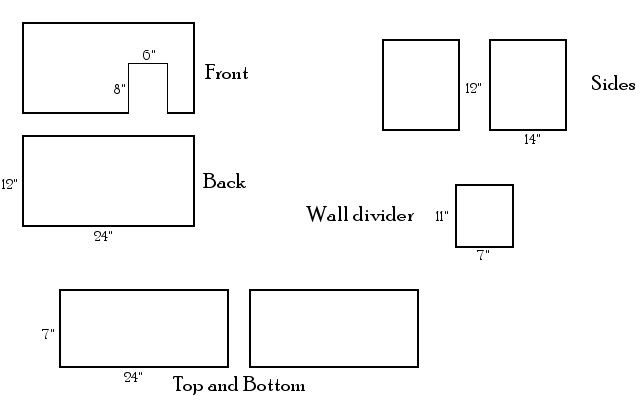
Step 2: Cut wood pieces
-Front/Back: 12" x 24"
-Sides: 12" x 14"
-Wall divider: 7" x 11"
-Top/Roof: 7" x 24"
Step 3: Take one of the side pieces, and create a 8" x 6" door in the side. (will be the door to get into the house)
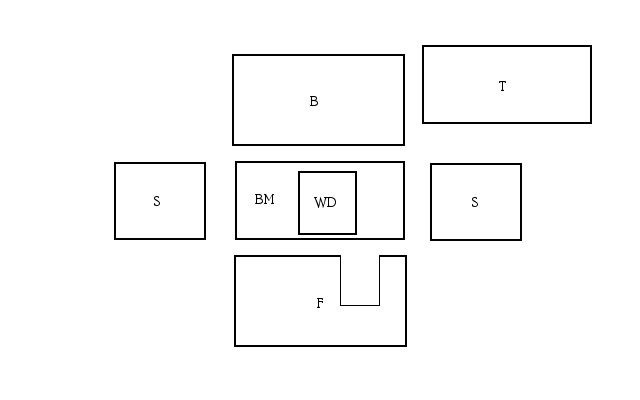
Step 4: Start Building the house!
-Lay out the pieces to show where they are to go.
-Pre-drill each screw hole.
-Assemble the house.
-Connect wall divider to bottom.
-Add the front and back.
-Add the sides.
-Add the top. (use hinges)
★ BabyQuad ★ PERRY THE PLATYPUS ★ Ern's Fave ★ dangerous with brooms ★
So now he had to install the bottom pieces. He had to make sure that they fit first soo like the instructions said it was time to measure.
The Gryffindor had cut numerous pieces before but now, as he looked at the bottom of the bench he could tell that the pieces were going to be too big.
SPOILER!!: Page 5
1. Prep the Area 2. Frame the Bench 3. Construct the Front Section 4. Double the Front and Back Support 5. Install the Bottom Supports
6. Attach the Plywood Sides
7. Attach the Top Piece
8. Attach the Strap Hinges
9. Attach the Trim
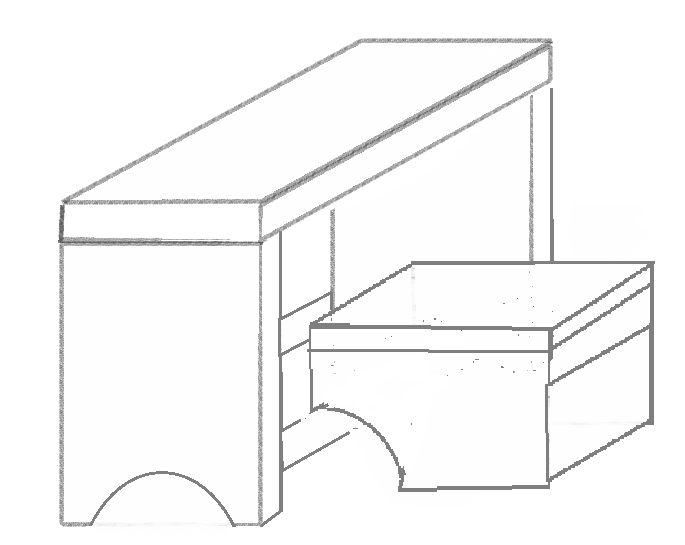
Step 5: Install the Bottom Supports
Measure the inside of the bottom of the box. Cut pieces of 2x4 to fit on the floor between the front and back bottom plates where the upright pieces meet. Keep these 2x4 supports lined up and level with the top of the 2x4s . Predrill the bottom supports so they can be toenailed into the bottom plates. This is where the 3/4" plywood bottom will sit.
Pulling out the measuring tape he lined it up with the back and front edge. Pushing the locking button down, Legend quickly wrote the length shown from the tape. He already had the width before.
The blond made his way to the other side of the bench and began to cut the pieces of wood off by an inch with the saw. BACCK and forth, back and forth. Sawing wasn't as difficult as yesterday. Yesterday his arms were sore for hours. Finishing the now simple action of cutting all the pieces he took up the drill and a board and began installing the wood to give the bottom of the bench.....a bottom.
ZZZZzzzzzZZZZzzzzzZZZZZzzzzzZZZZzzzz
He was actually starting to love that sound, the screw went in like butter. It was so easy now. He just had to make sure that he held the wood in place. After installing the fifth and final board, Legend's smile was obvious. HE WAS GETTING SOMEWHERE!
__________________
{act like you know me, but you never will}__{but there's one thing that I know for sure} {i'll show you}
Super Slytherin Buddy | | ⅓ She-Snake Trio | | a normal girl with normal knees
First nail is DONE!
MWAHAHAHAHAHAhahahaahahahahaha
Right, now back to work. Placing another nail to keep the wall divider nice and sturdy, Evelyn crossed that section off of her list before going onto the next. The front and back sides were next which should be easy enough. The only 'hard' thing that she was expecting to do with placing the hinges onto the house. She had noooo idea how to do that, but she would find out eventually. One way or another.
Taking the front piece that had the little door cut out of it, Evelyn lined it up with the bottom piece and wall divider before picking up another nail. This part, was actually a tad bit difficult, trying to keep the pieces level and lined up as she tried to get the first nail in. STAY! Dangit...
TAP TAP TAP TAP TAP BAM BAM BAM BAM BAM!
It was only after she got the nail in that she noticed that piece was slightly off. ARGH! Whatever! No, no, just...whatever. It was good enough. Barely noticeable! This part was going to be hidden anyways. It didn't matter. No use getting angry over it. She had a ton of other nails she needed to place in the wood pieces and, just, a lot of other things to do. No time to try and pry that little sucker out of there.
Continuing to place a line of nails in the wood to keep it sturdy and connected to both the bottom piece and wall divider, after about ten minutes or so, she had the third piece up. YES! Now, for the back piece. This one seemed a lot easier since now she had the hang of it, and the piece wasn't so wobbly with on balancing on the side of the bottom so all in all, this part turned out better than she expected.
Smiling as she finished with the front and back pieces, looking down, Evelyn noticed she was running out of nails and went to go find some more. Hehe. She was going to be done in no time!!
SPOILER!!: Niffler House Plans
Niffler House
Step 1: Gather tools and things needed.
- 7 pieces of good sturdy wood. (will cut to size later)
- 1 saw
- 1 power drill
- 1 hammer
- Nails
- Glue
- Two hinges
- 1 ruler/yard stick
Step 2: Cut wood pieces
-Front/Back: 12" x 24"
-Sides: 12" x 14"
-Wall divider: 7" x 11"
-Top/Roof: 7" x 24"
Step 3: Take one of the side pieces, and create a 8" x 6" door in the side. (will be the door to get into the house)
Step 4: Start Building the house!
-Lay out the pieces to show where they are to go.
-Pre-drill each screw hole.
-Assemble the house.
-Connect wall divider to bottom.
-Add the front and back.
-Add the sides.
-Add the top. (use hinges)
★ BabyQuad ★ PERRY THE PLATYPUS ★ Ern's Fave ★ dangerous with brooms ★
SPOILER!!: Page 6
1. Prep the Area 2. Frame the Bench 3. Construct the Front Section 4. Double the Front and Back Support 5. Install the Bottom Supports 6. Attach the Plywood Sides
7. Attach the Top Piece
8. Attach the Strap Hinges
9. Attach the Trim
Step 6: Attach the Plywood Sides
Cut and attach 3/4" plywood to the outside of the frame. Keep the top edge of the plywood flush with the top of the frame. Cut and attach the plywood bottom to the inside of the frame.
*Extra pieces of plywood is optional.
Ohhh Plywood time! Legend looked at the instructions and his smile grew even more. THIS MEANT HE WAS ALMOST DONE. Thank Merlin. This homework was way to tiring. Legend walked over to the side where there were pieces of wood. He needed Plywood. He needed about 12 pieces. The instructions told him basically that he only needed to put Plywood on the outside, but the inside was optional. It would look better if he put it on the inside. And that way when he put stuff in it they wouldnt become splintery. Right? Yeah good. Now he needed to cut them into the dimensions he had originally made on the paper.
Man he was lucky that he was smart enough to do that.
Clamping the big piece of Plywood down he got the saw and then began to cut. Push and pull back, push and then pull back. The motion was like a rhythm, and you had to follow it or else everything would be messed up. If you pulled back too slowly that would cause the saw to get stuck, and pushing to quickly would lead to cracking the wood. It was amazing what you could learn after only one building project.
After the normal pieces of Plywood were cut Legend got another piece for the top. This one had to be 1 inch longer and wider than the frame so that it would be easy to open. Cutting it easily Legend held out his arm and flexed. Doing all this cutting could really give him some muscles. Unfortunately he was a 14 year old boy that did not have the attention span to actually do this every day.
Picking up a piece of Plywood he screwed it on to the outside left side. First he made sure that the top was secure then he screwed the bottom. Five screws for both top and bottom which meant that both the inside and the outside would add up to 20 screws. That was crazy. Moving on to the left side Legend repeated his actions and then did the same thing for the front and the back.
Flipping the box on its side he began to drill in the inside Plywood. It was harder than the outside because he had to make sure that they didnt intercept with the L shaped boards and he was constantly banging his head against something. Finally the inside was complete and he only had the bottom part of the Plywood on the outside to screw in. Emerging from the box her turned it over again and quickly drilled in the 10 screws to the piece of wood.
__________________
{act like you know me, but you never will}__{but there's one thing that I know for sure} {i'll show you}
Super Slytherin Buddy | | ⅓ She-Snake Trio | | a normal girl with normal knees
Finding a bunch more nails, both big and small, Evelyn moved back to her station to finally put up the sides. It was definitely starting to look like a house now, which got the Slytherin all pumped up and ready to finish this thing so she could go give it to Orion.
Moving the house to its side once more, even easier now since it could balance on two sturdy pieces of wood and she didn't even have to hold it up with her hands or arms this time, the Slytherin placed one of the sides on top of the piece, making sure the it was straight and on line. Good. Picking up the hammer once more, and another nail, she started with nailing down one side before nailing down the other, making sure that it was not going to fall off anytime soon. Nope! It was sturdy as a rock!
Flipping the house over, she placed the last side piece onto the top, and nailed that one down too. OMG IT WAS LOOKING PERFECT. At least, in her mind it was. Sooner or later (probably five years from now), she was going to being thinking well...what was she thinking?
Bwahahaha!
Now it was time for the hard part. The hinges. How in the world was one supposed to put these on? She forgot to write down that part of the instructions, and she was NOOOOT going to be leaving her beautiful unfinished project behind to go look it up. Besides, she was almost done! Just attach the hinges to the top piece and side piece and she was done right? But hoooow was she supposed to attach them?
Moving the house so it was laying on the front side with the door, Evelyn picked up the top roof piece and held it against the side so it looked almost completely finished. Now then, if she placed the hinge liiiike...this...
No, that wouldn't work. And no, it was upside down. Wait, was it upside down? Was there a difference?!
Raising a brow, she decided to just go with her gut feeling and do it the way she thought was right. Her gut feeling was usually right ninety five percent of the time anyways. And her gut feeling was telling her that she had to use the power drill for this thing.
★ BabyQuad ★ PERRY THE PLATYPUS ★ Ern's Fave ★ dangerous with brooms ★
SPOILER!!: Page 7
1. Prep the Area 2. Frame the Bench 3. Construct the Front Section 4. Double the Front and Back Support 5. Install the Bottom Supports 6. Attach the Plywood Sides 7. Attach the Top Piece
8. Attach the Strap Hinges
9. Attach the Trim
Step 7: Attach the Top Piece
Cut the top plywood piece 1 inch longer the length and width of the plywood covered frame. Draw a line down the length of this top piece 3-1/4" from the edge. Using a circular saw, rip down this line to separate the top piece.
Attach the 3-1/4" top plywood piece to the top of the doubled up 2x4 back support, using the 18-gauge finish nailer. This is the section of the top to which the strap hinges will be attached.
He had already cut out the top piece of Plywood. Reading the instructions over twice and then took the last piece of Plywood over to where the circular saw was. Using a ruler he made a straight line to where he was going to cut the small piece off the wood for the hinges. Putting on his safety glasses he turned the saw on. This one was way more dangerous than the manual saw because it could slice his hand off no problem. So Legend took his time as the saw went from one edge of the wood to the other. Turning it off as it reached the end the fourth year noticed that he had done an almost perfect job! There were basically no splinters left on the wood. He picked up a stray piece of sandpaper that was on the shelf and quickly sanded the splinters that were there off.
Legend picked up the smaller piece of wood (the 3-1/4 inch) and the nail gun. Laying the small piece of wood on the top edge of the bench he held it steady with his hand and pressed the button on the nail gun.
The force that came out was crazy; it almost took him off his feet. Who knew a little device like this was so powerful? Shaking his head Legend was ready for it the second time. And the third, and the fourth. He had become a pro with the nail gun by the time he reached the end and the board was stuck on the other piece of wood for good. “This is by far my favourite tool.” No doubt. He wanted to take it home.
Maybe nails Gabs to a wall.
__________________
{act like you know me, but you never will}__{but there's one thing that I know for sure} {i'll show you}
Nymphy came in and started working on the birdhouse.....he was so close to being done. In fact, this was his last step before he took it outside.
He put the roof all the way on the base. After a few nails, the actual "house" part of the bird house lay before him. He was very proud of himself.....it looked very cool!!!
He packed up and went to the dormatory to go to bed...
Super Slytherin Buddy - ⅓ She-Snake Trio || EVIL Healer
Marie came back to the workshop when she had finished eating dinner. She was now going to put on the rafters she had planned on doing earlier... before she realized she had forgotten to cut the angles.
Ready to get this project done she grabbed 2 of the boards and fitted them in place at the front of the house. She nailed the rafter boards to the front wall panel making sure they came together just right at the top. She then did the same thing at the back of the house.
Now all she had left to do was the middle rafters. Seeing that there was no wall panel to attach them to she was a bit confused about how she was going to make them stay. It looked like she was going to need some wood glue for this one.
Going through some cabinets she finally found the glue. She then took the last two rafter boards and lined them up in the middle of the house on top of the frame. She then marked the area with a pencil and removed the boards. Opening the glue she spread a generous amount over the marked areas. She then put the boards back in place and added more glue to the top of the boards.
Looking at it making sure the boards were lined up she decided to wait until tomorrow to do anything else. She needed to let that glue dry before she pounded any nails into those boards.
She put the glue, nails and hammer away. She then found a large clamp that she could use to keep the top of the middle rafters together until the glue dried.
After attaching the clamp she looked around the work area one last time. Satisfied that everything was put away she left for the night. She would return tomorrow and put the roof on.
SPOILER!!: The Plans
Tools needed:
Nail Beater (Hammer)
3" Galvanized Nails
2" galvanized flathead nails
Saw
Tape Measure
Safety Glasses
Wood Glue
Cutting list......
ITEM No. MATERIAL / SIZE AMOUNT AND LENGTH DESCRIPTION (1) 2x2 treated stock 3 @ 48" Under floor skids (2) 1x6 treated stock 8 @ 31-1/4" floor (3) 2x2 stock 4 @ 31-1/4" Top and bottom plates for front and rear wall frames. (4) 2x2 stock 8 @ 14" front and rear wall frame studs
(5) 2x2 stock 2 @ 44" Side wall top plates (6)&(8) 1 sheet 48" x 96" x 3/8" thick exterior type plywood. cutting dimensions as per pattern wall cladding (7) 2x2 stock 6 @ 22" (long point) with 45deg angle cut each end Rafters. see cutting dimensions in diagram below (9) 1x6 treated stock 10 @ 60" Roofing boards
Step one Pre-cut all the skids, flooring, plates, studs and rafters to the lengths as stated above and cut the plywood wall panels from the plywood sheet to the pattern as shown on the diagram below.
Step two Fix the 8 floorboards (#2) to the three under floor skids (#1) with 3" galvanized nails. Ensure the finished floor dimensions are 31-1/4" x 48". The three under floor skids should be evenly spaced with two each side and one in the middle.
Step three Nail the front and rear frames comprising of top and bottom plates (#3) and studs (#4) together. Overall frame dimensions of both front and rear frame should be 18" high and 31-1/4" wide. Ensure the placement of the intermediate studs allow enough of a gap (12") for the doorway. See diagrams for reference. Stand and fix the front and rear frames in place at each end of the floor.
Step four Fix the 2 sidewall top plates (#5) in place. See diagrams for reference.
Step five Fix the wall panels (#6,#8) to the frames using 2" galvanized flathead nails.
Step six Fix the rafters (#7) in place.
Step seven
Fix the 10 roofing boards (#9) (5 each side) to the rafters beginning with the lowest board. The roof boards are 60" long and the kennel is 48" long, therefore the roof boards should overhang each end of the kennel by 6". The first roofing board should overhang the sidewalls by 1" to 2". Fix the rest of the roofing boards in place checking that all overlaps are even.
★ BabyQuad ★ PERRY THE PLATYPUS ★ Ern's Fave ★ dangerous with brooms ★
His bench was basically done. Legend could have gone back to the common room and relaxed but he wanted to finish. If he finished it today then he could brag how he finished it in two days. And plus, then he wouldn’t have to come back.
SPOILER!!: Page 8
1. Prep the Area 2. Frame the Bench 3. Construct the Front Section 4. Double the Front and Back Support 5. Install the Bottom Supports 6. Attach the Plywood Sides 7. Attach the Top Piece 8. Attach the Strap Hinges
9. Attach the Trim
Step 8: Attach the Strap Hinges
Line up the larger section of the top with the smaller section that was just attached. Separate the two top pieces where they meet, using 3" framing nails as spacers. Determine how many strap hinges to use, then mark their locations. Use one strap hinge every 16 to 20 inches.
Attach the stationary part of each hinge to the 3-1/4" section of the top with 1-1/2" wood screws. Make sure these screws sink into the supporting 2x4s. Attach the strap part of the hinges to the flip top. Paint or stain the outside of the bench.
He picked up the other piece of Plywood for the top and positioned it so it lined up right next to the smaller piece. Separating the pieces of wood with the framing nails he got the hammer and lightly hammers the nails in so that they wouldn’t be too tight. He really didn’t understand why he needed the stupid nails anyways if he was going to screw the hinges on.
Legend decided to use three hinges. If he needed more later on then he could add more. Three seemed like a good number anyways, if they were basically going to be far apart. Legend made a mark to where the three hinges would go. Picking up a stationary part and the drill he carefully drilled that part to the 3-1/4 inch piece of wood. Looking at it closely he decided that it was okay and then did the same thing for the other two.
Now he had to connect them.
ZZZZZZZZZZzzzzzzzzzzzzzzzzzzzzzzzzzzZZZZZZZZZZZZZz z
Legend drilled in the first flap part of the hinge onto the bigger piece of Plywood. Once he was sure that the hinge was on right he made his way on to the second one and then the third.
Putting the drill down, Legend knew it was the moment of truth. Slowly he lifted up the top and...
IT WORKED! The hinge kept it together and inside seemed smooth and smelt like wood. Closing it his grin was now bigger than ever. Now all he had to do was paint. First he would paint the trim though so it would have time to dry.
He didn’t want to use regular paint because that was BORING so he had gone with---
SPRAY PAINT! Legend grabbed a can of black and began shaking it. Stopping for a second he ran over to the saftey box and looked for a mask to cover his mouth so he wouldn’t breath in the paint. When the mask was on he went over to the trim (it was really thin Plywood that he had cut out before when he was on his cutting spree) and lay it down on a piece of old newspaper on the floor.
Shaking the can once more Legend began to spray the back paint onto the trim as evenly as possible. Once he was done and it was dry he took over can off black paint and began to apply a second coat.
Finally the second can had finished and the wood was no perfectly black. Legend grabbed three cans of light blue paint and turned back to his box. He didn’t need any old newspaper under it because he had the outline that he had first made there. Pressing the button he went crazy.
The spray sound filled the room. After 30 minutes Legend had completely used up the three spray cans of the light blue paint.
Turning back to the floor he opened a can of varnish and began to pain the trim. He NEEDED it to be shinny. Shinny looked good. After the TRIM was varnished he turned BACK to the bench.
He was going to varnish that for sure but FIRST he had to do something. Opening a can of black and silver paint he took out a much smaller paint brush and began to write a word across the front. Above the word he drew a small picture that included colors from yellow and white paint.
Finally, FINALLY after that was drawn he began to varnish the box.
After this there was only ONE thing left.
__________________
{act like you know me, but you never will}__{but there's one thing that I know for sure} {i'll show you}
Atypical Ravenclaw Bookworm // Hair Flipper Pro / / the edgy starbuckian // Hot Messie
Mina looked at the two pieces she had and tilted her head in thought. She was so close to being done with it. Yes, she just needed to put them together and viola, she would have a step stool.
It was just a simple task of placing the hinges now and then attaching the step to the stool portion. Yes, it was going to be simple and straight forward this part. She couldn't possible mess this up.
Finding the hinges, she looked at them closely. She needed to place them properly so that the hinges worked. A backward hinge would not be good at all.
Laying the step flat on her workstation, she located the markings she made before and reached for the screws. The hinges needed to be some 32 mm from the ends. Placing the first hinge down, she screwed in the screw by hand before reaching for the drill again.
Lining up the bit and the screw, she pulled the trigger and finished screwing the hinge in. Taking great care not to over screw. The screws needed to just sit in the holes flush and still allow the hinge to work.
Testing out the hinge, she smiled. Okay, the first hinge seemed to work and she just needed to attach the other one now.
SPOILER!!: Step Stool Plans
Supplies
Boards of 235mm x 19mm (3/4" x 9 1/4") wood
2 pieces of 235mm x 19mm (3/4" x 9 1/4") wood, cut to a length of 381mm (15 1/4")
1 piece of 235mm x 19mm (3/4" x 9 1/4") wood, cut to a length of 400mm (16")
2 pieces of 235mm x 19mm (3/4" x 9 1/4") wood, cut to a length of 181mm (7 1/4")
1 piece of 235mm x 19mm (3/4" x 9 1/4") wood, cut to a length of 325mm (13")
Boards of 90mm x 19mm (3/4" x 3 1/2") wood
3 pieces of 90 mm x 19mm (3/4" x 3 1/2") wood, cut to a length of 338mm (13 1/2")
1 piece of 90mm x 19mm (3/4" x 3 1/2") wood, cut to a length of 263mm (10 1/2")
1 piece of 69mm x 19mm (3/4" x 2 3/4") wood, cut to a length of 263mm (10 1/2")
Super Slytherin Buddy | | ⅓ She-Snake Trio | | a normal girl with normal knees
Lining up the hinge to the top and back pieces of the house, the Slytherin grabbed one of the smaller nails and hammer before lining up the nail into the little hole of the small golden hinge. Tapping the hammer onto the nail slight so it stayed in, she then picked up the evil power drill once more before drilling the nail into the wood.
And that NOISE! It was annoying! She was soooo happy she only had to hear it three more times!
Repeating the process again in the other hole of the hinge, and ending with the power drill, Evelyn set the house up right for a moment to see if she had placed the hinges on correctly. Opening the top lid, she expected the one side that didn't have a hinge act all wonky, which...it did, but she was surprised to see that she had in fact, placed the first one on properly.
Hehehehehehehehehehe....
Open...
Close...
Open...
Cloooooooose.
Yush. It was working properly. Smirking at her obvious genius...ness... the Slytherin placed the house back to laying on the front piece before starting on the second golden hinge. Aw, she should've thought of using silver! Oh well. She just wanted to be done with it.
After only about another five minutes, and making sure everything line up as perfectly as it could be, the second hinge was on, and she was pretty much done with her project. YEESSSS!
NOW THE FUN PART! Mwahahahaha!
SPOILER!!: Niffler House Plans
Niffler House
Step 1: Gather tools and things needed.
- 7 pieces of good sturdy wood. (will cut to size later)
- 1 saw
- 1 power drill
- 1 hammer
- Nails
- Glue
- Two hinges
- 1 ruler/yard stick
Step 2: Cut wood pieces
-Front/Back: 12" x 24"
-Sides: 12" x 14"
-Wall divider: 7" x 11"
-Top/Roof: 7" x 24"
Step 3: Take one of the side pieces, and create a 8" x 6" door in the side. (will be the door to get into the house)
Step 4: Start Building the house!
-Lay out the pieces to show where they are to go.
-Pre-drill each screw hole.
-Assemble the house.
-Connect wall divider to bottom.
-Add the front and back.
-Add the sides.
-Add the top. (use hinges)
Super Slytherin Buddy - ⅓ She-Snake Trio || EVIL Healer
Marie came into the workshop today knowing that today was the day she was going to finish building Frankie's cruphouse. All she had left to do was to put the roofing boards on. Ten boards and thirty more nails and she would be done. Well done with evevrything except the painting, which she might start today if she has time.
Standing in front of her workstation she couldn't help but smile as she looked at the work she had already completed.If someone would have told her a couple of months ago that she would be building something she would have told them they were crazy.
Okay, enough with the standing around admiring her work, it was time to get to work now. After getting out the hammer and nails... for the last time, she removed the clamp and made sure the glue had dried on the middle rafter boards before adding a couple of nails to them, you know just to make sure they weren't going to go anywhere.
Now to add the roof boards. She grabbed the first of the roofing boards to start nailing it in place. Geesh this was a long board. It wasn't so easy holding it in place and hammering at the same time.
After what seemed like hours she finally had the first board attached to the roof. Only nine more to go. At the speed she was going though it was going to take all day to finish this. After several pain staking hours she had finally added the last of the boards.
Standing back and looking at the house in amazement, she couldn't believe she had actually built something without using magic. Sure it was a little crooked and the doorway wasn't perfect but she didn't care because she had done this all on her own... without any help. Tired and hungry she quickly cleaned up her work station and left.
There would be no painting today that's for sure.
SPOILER!!: The Plans
Tools needed:
Nail Beater (Hammer)
3" Galvanized Nails
2" galvanized flathead nails
Saw
Tape Measure
Safety Glasses
Wood Glue
Cutting list......
ITEM No. MATERIAL / SIZE AMOUNT AND LENGTH DESCRIPTION (1) 2x2 treated stock 3 @ 48" Under floor skids (2) 1x6 treated stock 8 @ 31-1/4" floor (3) 2x2 stock 4 @ 31-1/4" Top and bottom plates for front and rear wall frames. (4) 2x2 stock 8 @ 14" front and rear wall frame studs
(5) 2x2 stock 2 @ 44" Side wall top plates (6)&(8) 1 sheet 48" x 96" x 3/8" thick exterior type plywood. cutting dimensions as per pattern wall cladding (7) 2x2 stock 6 @ 22" (long point) with 45deg angle cut each end Rafters. see cutting dimensions in diagram below (9) 1x6 treated stock 10 @ 60" Roofing boards
Step one Pre-cut all the skids, flooring, plates, studs and rafters to the lengths as stated above and cut the plywood wall panels from the plywood sheet to the pattern as shown on the diagram below.
Step two Fix the 8 floorboards (#2) to the three under floor skids (#1) with 3" galvanized nails. Ensure the finished floor dimensions are 31-1/4" x 48". The three under floor skids should be evenly spaced with two each side and one in the middle.
Step three Nail the front and rear frames comprising of top and bottom plates (#3) and studs (#4) together. Overall frame dimensions of both front and rear frame should be 18" high and 31-1/4" wide. Ensure the placement of the intermediate studs allow enough of a gap (12") for the doorway. See diagrams for reference. Stand and fix the front and rear frames in place at each end of the floor.
Step four Fix the 2 sidewall top plates (#5) in place. See diagrams for reference.
Step five Fix the wall panels (#6,#8) to the frames using 2" galvanized flathead nails.
Step six Fix the rafters (#7) in place.
Step seven Fix the 10 roofing boards (#9) (5 each side) to the rafters beginning with the lowest board. The roof boards are 60" long and the kennel is 48" long, therefore the roof boards should overhang each end of the kennel by 6". The first roofing board should overhang the sidewalls by 1" to 2". Fix the rest of the roofing boards in place checking that all overlaps are even.
Super Slytherin Buddy | | ⅓ She-Snake Trio | | a normal girl with normal knees
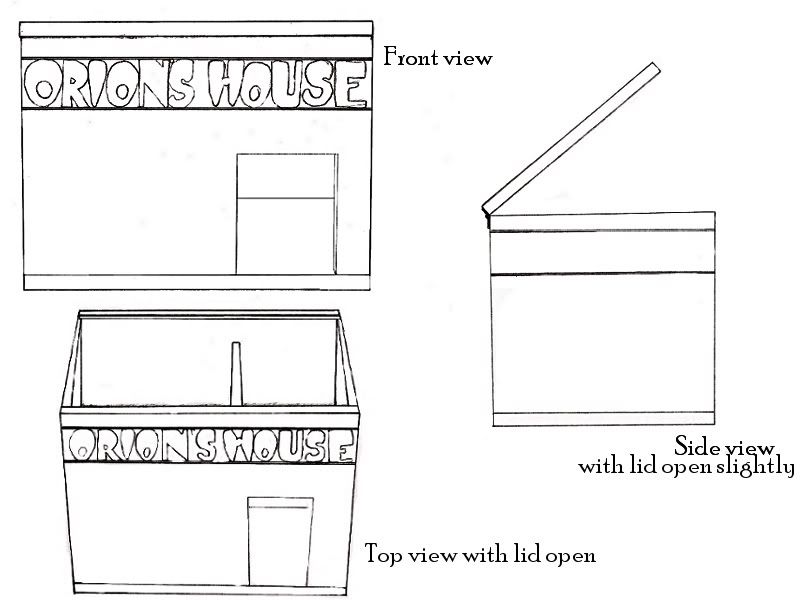
PAINTING!
She just needed, to find some paint stuff and brushes. In her particular excitment that she was almost done with her project, it didn't take her all that long to find the paint and brushes, which she was surprised were even in here. She thought she'd might have to go to the Charms professor to get some.
But, this totally saved a time consuming trip. Shoving everything else to the side, the Slytherin set down the white and silver paint, and three different types of brushes. Alright then. What to do, what to do...
Obviously, she had to put Orion's name on the thing, so she'll paint that and...house. Orion's house. Good enough!
Taking one of the discarded pieces of wood that she had shoved to the side, Evelyn shook that bottle that held the white paint before putting a rather large drop of it onto the wood, before doing the same with the silver. Hehe. Placing the house onto it's back, causing the top to open up as well, Evelyn took the large of the three brushes and starting painting on 'Orion's House' with the white paint. This was going to look so nice!
After finishing with the white paint, she used the second to smallest brush to even out the edges, before going onto the smallest of the three brushes. Dipping it into the silver paint, the black eyed Slytherin started to outline the white letters with it, not only giving it a clean finish, but it just looked awesome too.
And, half an hour later after painting....she was DONE! With Everything! Laying the brush down on the side, Evelyn set the house upright and stood back to look at her finished project. A redwood Niffler house. Genius. And it would totally go with Orion's fur nicely too.
Super Slytherin Buddy || ⅓ She-Snake Trio || 'I taste like chocolate and potatoes'
SPOILER!!: Bird House Plans
Supplies
* hammer and 1/2" finishing nails
* waterproof glue
* sandpaper
* drill with 1-3/8" hole saw and 1/4" drill bit
* 1/2" plywood in sizes for two bottom sides and two inside supports
* 1/4" plywood for two roof sections, each 7" x 5"
* 1/4" plywood for the front and back sections, each 5-7/8" square<
* 5" length of dowel to finish the top, and 3" length of dowel for bird perch
* optional: paint or stain
Directions 1. Before proceeding with each joint, start the nails, tapping into position, then apply waterproof glue along the joint edge.
2. Butt and glue the two bottom sides together.
3. Next, glue and nail the back section to the bottom sides.
4. Glue and nail the inside supports; for positioning on the back.
5. Using the 1 3/8 hole saw, drill a hole in the front section so that the top of the hole is 2" down from a corner. Use a 1/4" bit to drill a hole for the dowel perch, 5'8" below the bottom of the larger entrance hole. Sand the edges smooth, and sand all other inner parts of the bird house before nailing down the front.
6. Glue and nail the front to the bottom sides and the inside supports.
7. Position roof sections so that they meet, but do not butt at the top. Glue and nail the roof sections into place. The roof overhangs the sides, as shown.
8. Glue the 5" dowel in the channel between the roof sections to complete this joint.
9. Sand all surfaces.
10. Lastly, glue the 3" dowel into position as a perch.
Your bird house is now ready to stain or paint as desired.
Note: The size of hole that you make in your bird house and its height above ground will determine, in part, what kind of bird your bird house attracts.
Meh.
It was official.
Destiny did NOT like Muggle Studies anymore.
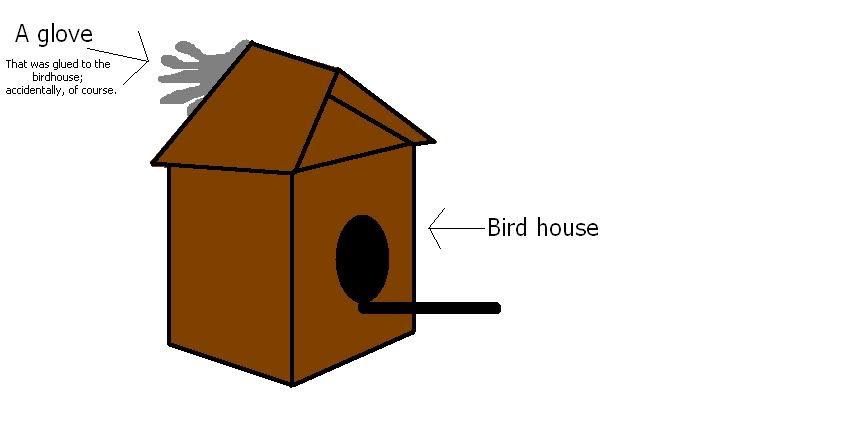
She wasn't so sure if the next Muggle Studies Professor would ever be graced with her presence. As she went on and on with this bird house, it was looking less and less likely. BOYCOTT the Muggle Studies.
She might have announced that, too, if she wasn't hunched over her bird house, trying her hardest to un-stick the glove from either her forehead or the bird house itself. How in the name of Merlin did THIS happen!? Grabbing the glove, she gave a quick jerk of her head, FINALLY getting the glove off her forehead. Too bad the glove was STILL stuck to the bird house, though. She didn't care about that, for she was FREE!
HUZZAH!
She was sure she was missing a piece of skin from her forehead with how much it hurt at that moment. She didn't dare feel the spot, though, for fear of not having a forehead at all. Merlin, she would rather have the glove back instead of missing her forehead. She'd be TEASED for life. But that wasn't important right now. what WAS important was the birdhouse that she needed to finish. She only had two easy steps left and then she was FINISHED!
Rubbing her hands together, she read the next step. Sanding the whole bird house? That was an important step..and if she didn't do it, the poor little birds would have splinters! Pffft, she didn't want THAT to happen. Picking up a sheet of the sandpaper, she rubbed it against the wood. When she finished sanding the whole thing, she rubbed a finger against it, making sure it was smooth enough. She didn't know how smooth it was supposed to be, but she figured it was good enough as it is.
Crumbling up the piece of sandpaper, she threw it over her shoulder. "Oops." she murmured, not bothering to pick it up. She'd get it later..if she remembered. Destiny didn't bother reading the last step. She knew what had to be done, and she knew what it involved; the other dowel and the bottle of glue. Picking up the bottle of glue, she squeezed it into the hole she had drilled earlier and placed the dowel inside. She held it there for a minute, just so she was sure it would stay in place.
Removing her hand from the dowel, she stood back and admired her FINISHED bird house.
Meh..
..it needed paint.
And she was soooo leaving that glove glued to the top.
__________________
____________ooh, ooh, she's the rough and the rowdiest kid________ ooh, ooh, and there's more where she lives_____
★ BabyQuad ★ PERRY THE PLATYPUS ★ Ern's Fave ★ dangerous with brooms ★
He was almost done this. Which was amazing, because he was sure that he looked horrible (how could he not with all the paint, dust and sweat?) and he was pretty sure that he smelled even worse. Legend picked the trim from the ground. He was lucky that he had cut it out pretty well. The pieces werent all together but that was what the glue was for.
SPOILER!!: Page 8
1. Prep the Area 2. Frame the Bench 3. Construct the Front Section 4. Double the Front and Back Support 5. Install the Bottom Supports 6. Attach the Plywood Sides 7. Attach the Top Piece 8. Attach the Strap Hinges 9. Attach the Trim
Step 9: Attach the Trim
Cut the 1x4 clear pine pieces to length, and attach them along the top and bottom of the visible face of the bench to create horizontal trim.
Cut some 1x4 pieces (stiles) to fit between the top and bottom trim. Start by covering the plywood corner and work outward. This style of trim will create a panel look. The number and spacing of the stiles used is a matter of personal preference.
The Gryffindor had looked at the instructions right after he was done putting on the varnish on the box. Turning a piece of the trim over to the unpainted side he picked up the carpenter glue and made a big trail down it. Quickly he picked the piece back up and aligned it to the edge of the front of the bench. Legend pushed the piece down hard so that pressure would be applied and the piece would hold on. After about a minute he let go. That thing was on for good.
He took another piece of the trim and repeated the action he had done before. Soon the bench was covered and he happily (and sort of sadly) could say that it was finish.
Yes. After two days of blood, sweat, and tears (well not real tears because Legend didnt cry) he could said that he built this storage bench all by himself, alone, with only instructions to help him. It was an amazing feeling. He walked around inspecting the storage bench until finally he was satisfied. Closing the top Legend brushed his hand on it and left it right in the middle of the workbench so the Professor could see it.
Legend quickly cleaned up any messes that he made and HAPPILY left the Workshop.
__________________
{act like you know me, but you never will}__{but there's one thing that I know for sure} {i'll show you}
Atypical Ravenclaw Bookworm // Hair Flipper Pro / / the edgy starbuckian // Hot Messie
Success! Mina had managed to get the hinges on and not mess them up. Well at least they looked like they were on correctly. The true test would still be to see if the hinges would pivot correctly once she had attached the step section to the stool section.
Pulling the stool section before her, she located the front of it and then processed to line up her markings with the hinge. Of course, the markings were a bit faded now and all, but she could still make them out and the holes she pre-drilled before.
Double checking to make sure the step section was perfectly centred, she reached for the screws and started to screw the loose ends of the hinges to the front of the stool, by hand. She would go back with the power drill once she had set them all in place.
Ensuring that the screws were completely flush, she tried the step section out. If she had done it correctly, the step section would fold into the stoll section.
It was the moment of truth......and success! The hinges pivoted as they were supposed to and the step section folded into the stool section. It was almost perfect!
SPOILER!!: Step Stool Plans
Supplies
Boards of 235mm x 19mm (3/4" x 9 1/4") wood
2 pieces of 235mm x 19mm (3/4" x 9 1/4") wood, cut to a length of 381mm (15 1/4")
1 piece of 235mm x 19mm (3/4" x 9 1/4") wood, cut to a length of 400mm (16")
2 pieces of 235mm x 19mm (3/4" x 9 1/4") wood, cut to a length of 181mm (7 1/4")
1 piece of 235mm x 19mm (3/4" x 9 1/4") wood, cut to a length of 325mm (13")
Boards of 90mm x 19mm (3/4" x 3 1/2") wood
3 pieces of 90 mm x 19mm (3/4" x 3 1/2") wood, cut to a length of 338mm (13 1/2")
1 piece of 90mm x 19mm (3/4" x 3 1/2") wood, cut to a length of 263mm (10 1/2")
1 piece of 69mm x 19mm (3/4" x 2 3/4") wood, cut to a length of 263mm (10 1/2")
Super Slytherin Buddy || ⅓ She-Snake Trio || 'I taste like chocolate and potatoes'
SPOILER!!: Bird House Plans
Supplies
* hammer and 1/2" finishing nails
* waterproof glue
* sandpaper
* drill with 1-3/8" hole saw and 1/4" drill bit
* 1/2" plywood in sizes for two bottom sides and two inside supports
* 1/4" plywood for two roof sections, each 7" x 5"
* 1/4" plywood for the front and back sections, each 5-7/8" square<
* 5" length of dowel to finish the top, and 3" length of dowel for bird perch
* optional: paint or stain
Directions 1. Before proceeding with each joint, start the nails, tapping into position, then apply waterproof glue along the joint edge.
2. Butt and glue the two bottom sides together.
3. Next, glue and nail the back section to the bottom sides.
4. Glue and nail the inside supports; for positioning on the back.
5. Using the 1 3/8 hole saw, drill a hole in the front section so that the top of the hole is 2" down from a corner. Use a 1/4" bit to drill a hole for the dowel perch, 5'8" below the bottom of the larger entrance hole. Sand the edges smooth, and sand all other inner parts of the bird house before nailing down the front.
6. Glue and nail the front to the bottom sides and the inside supports.
7. Position roof sections so that they meet, but do not butt at the top. Glue and nail the roof sections into place. The roof overhangs the sides, as shown.
8. Glue the 5" dowel in the channel between the roof sections to complete this joint.
9. Sand all surfaces.
10. Lastly, glue the 3" dowel into position as a perch.
Your bird house is now ready to stain or paint as desired.
Note: The size of hole that you make in your bird house and its height above ground will determine, in part, what kind of bird your bird house attracts.
Destiny wondered if she should paint the glove, too!?
It was sorta like a decoration, just sitting there on top of the bird house, wiggling it's fingerless fingers. She would have tired to remove it, but if it ripped her forehead off, imagine what it would do to the wood! There would be a GINORMOUS hole in the roof and the birds would never have any type of privacy.
Plus, if rained, the birds would get all wet..meaning they'd be sick..and then..well, she didn't want to think about what would happen after that.
Reaching over the workstation, she first grabbed a paintbrush, then decided to keep the bird house brown. It would blend in niiiiicely with the Whomping Willow..which was were she was going to hang her MASTERPIECE creation.
It was a shaaaame that this was Muggle Studies class and all. Destiny would have LOVED to use that snazzy paint charm she learnt to make the bird house flash different colors. The flashing colors would draw in lots birds and she would have the most popular bird house in the HISTORY of bird houses!
Perhaps she could still use that charm; she'd just have to wait until AFTER she left the workshop. She use that charm AND fix those very crooked nails.
Dipping the paintbrush in the paint, she lent over the bird house, trying her best NOT to make a mess. After all this Muggle work, she didn't want to have to clean afterwards. Plusssss, she would have to clean the Muggle way, and pffft, she wasn't going through THAT again. Starting with the roof, she worked her way down, twirling the brush around..and around..and around..and you get the point. After a little bit of time, since she was in a rush to get out of the workshop, she placed the paintbrush down and the bird house was FINISHED!!!
Wooot!
As the paint dried on the bird house, Destiny tidied up her station, making sure all the tools were put back in their correct places and any extra pieces of wood were..disposed of. She even went and picked up the crumbled piece of sandpaper she had thrown earlier. Standing back, she nodded her head in approval of her bird house and her tidy station.
It was time to visit the Whomping Willow!
SPOILER!!: The bird house..and my awesome paint skills..just kidding about the skills :D
__________________
____________ooh, ooh, she's the rough and the rowdiest kid________ ooh, ooh, and there's more where she lives_____
Atypical Ravenclaw Bookworm // Hair Flipper Pro / / the edgy starbuckian // Hot Messie
Mina took a step back and looked at her work. Okay it was like completely perfect by any means but it looked like it would be sturdy enough to hold herself on it.
Glancing at the plans again, she nodded. Okay, she just needed to fill in the holes and she would be done with it. She had a few options and all but she didn't like half of them. There was no way that she was going to just leave the screws exposed and the idea of caps sounded very tacky to her.
So it just left her with two options. She would need wood filler or a plug for both of them. Looking around, she spotted it some filler and smiled. Yes, this was going to be the easiest part for sure.
Reaching for the drill again, she proceeded to countersink the exposed screws slightly. With all of them countersink, she then began to fill then in with the filler.
SPOILER!!: Step Stool Plans
Supplies
Boards of 235mm x 19mm (3/4" x 9 1/4") wood
2 pieces of 235mm x 19mm (3/4" x 9 1/4") wood, cut to a length of 381mm (15 1/4")
1 piece of 235mm x 19mm (3/4" x 9 1/4") wood, cut to a length of 400mm (16")
2 pieces of 235mm x 19mm (3/4" x 9 1/4") wood, cut to a length of 181mm (7 1/4")
1 piece of 235mm x 19mm (3/4" x 9 1/4") wood, cut to a length of 325mm (13")
Boards of 90mm x 19mm (3/4" x 3 1/2") wood
3 pieces of 90 mm x 19mm (3/4" x 3 1/2") wood, cut to a length of 338mm (13 1/2")
1 piece of 90mm x 19mm (3/4" x 3 1/2") wood, cut to a length of 263mm (10 1/2")
1 piece of 69mm x 19mm (3/4" x 2 3/4") wood, cut to a length of 263mm (10 1/2")
Tape measure
Wood pencil
Table saw
Jig-saw
Power drill
Wood glue
Thirty-eight 50mm (2") long wood screws
Couple of hinges
Step 1: Cut the pieces
Step 2: Mark and drill the screw holes
Step 3: Fix the stool sides to the front rail
Step 4: Fix the stool sides to the rear rails
Step 5: Screw on the stool top
Step 6: Make the step frame
Step 7: Screw on the tread
Step 8: Fit the hinges
Step 9: Fix the step to the stool
Step 10: Fill the screw holes
Again she stood back and looked over her work. It wasn't a true masterpiece or anything, but it was adequate and all. It probably needed staining and all, but she wasn't about to go that. If anything, she could just get Jade to do it once she gave it to her. Yes, her cousin would stain it once she got home for break.
Setting her work a side, she started to tidy up her area. Leaving a mess wasn't nice and she had kind of made a mess and all.
Super Slytherin Buddy - ⅓ She-Snake Trio || EVIL Healer
This was it, TODAY was the final day she would be here in this workshop. Well this tem anyway. Once she had Frankie's cruphouse painted she would be able to take it to him. That is if she could get it out of the shop without using magic. Now that it was all built it was heavy and hard for her to move by herself. Oh well, she would worry about that later.
After gathering all the paint materials needed she took them to her work station and set them out. She was going to paint the house green of course with a brown roof and silver lettering for Frankie's name.
Grabbing one of the bigger brushes she first painted the house with a primer. How did she knw to do this? Well she read the directions on the paint cans that's how. By the time he was done with that the first wall she had painted was already dry. She closed up the primer paint, quickly rinsed out the brush so the paint wouldn't dry in it then used it to paint the walls green. It only took one coat of the green since she had used a primer. Next she would paint the roof... right after she cleaned the brush again and closed up the green paint.
After she had that all cleaned up and put away it was not time to paint Frankie's name on above the door. She opened the small can of silver paint and grabbed a small brush. She very carefully spelled out Frankie making sure not to let any paint drip. She would hate to have to start over with this.
Stepping back and looking at the house she couldn't help but smile to herself. She did it, she had actually built something and you could tell what it was.
She closed up the paint and rinsed out the brush she had just been using. She felt really good about what she had done. Just as she was getting ready to leave she took one last look at the house and decided it needed something else. It needed a BONE painted on the side. She went back to the paints and found one that looked like it would be a bone color, grabbed a medium sized brush and painted a bone on both sides of the house.
Standing back looking at it again she was now happy with it. Hopefully Frankie would like it when she took it to him.
After cleaning up... again, she shut off the lights to the workshop and left. She would have to ask Lawson for help getting it out of the workshop later. Once it was outside she would be able to levitate it to the nursery...
...unless Lawson took it there for her.
SPOILER!!: Don't be jealous that your crup doesn't have a house as awesome as this one
SPOILER!!: The Plans
Tools needed:
Nail Beater (Hammer)
3" Galvanized Nails
2" galvanized flathead nails
Saw
Tape Measure
Safety Glasses
Wood Glue
Cutting list......
ITEM No. MATERIAL / SIZE AMOUNT AND LENGTH DESCRIPTION (1) 2x2 treated stock 3 @ 48" Under floor skids (2) 1x6 treated stock 8 @ 31-1/4" floor (3) 2x2 stock 4 @ 31-1/4" Top and bottom plates for front and rear wall frames. (4) 2x2 stock 8 @ 14" front and rear wall frame studs
(5) 2x2 stock 2 @ 44" Side wall top plates (6)&(8) 1 sheet 48" x 96" x 3/8" thick exterior type plywood. cutting dimensions as per pattern wall cladding (7) 2x2 stock 6 @ 22" (long point) with 45deg angle cut each end Rafters. see cutting dimensions in diagram below (9) 1x6 treated stock 10 @ 60" Roofing boards
Step one Pre-cut all the skids, flooring, plates, studs and rafters to the lengths as stated above and cut the plywood wall panels from the plywood sheet to the pattern as shown on the diagram below.
Step two Fix the 8 floorboards (#2) to the three under floor skids (#1) with 3" galvanized nails. Ensure the finished floor dimensions are 31-1/4" x 48". The three under floor skids should be evenly spaced with two each side and one in the middle.
Step three Nail the front and rear frames comprising of top and bottom plates (#3) and studs (#4) together. Overall frame dimensions of both front and rear frame should be 18" high and 31-1/4" wide. Ensure the placement of the intermediate studs allow enough of a gap (12") for the doorway. See diagrams for reference. Stand and fix the front and rear frames in place at each end of the floor.
Step four Fix the 2 sidewall top plates (#5) in place. See diagrams for reference.
Step five Fix the wall panels (#6,#8) to the frames using 2" galvanized flathead nails.
Step six Fix the rafters (#7) in place.
Step seven Fix the 10 roofing boards (#9) (5 each side) to the rafters beginning with the lowest board. The roof boards are 60" long and the kennel is 48" long, therefore the roof boards should overhang each end of the kennel by 6". The first roofing board should overhang the sidewalls by 1" to 2". Fix the rest of the roofing boards in place checking that all overlaps are even.
She walked over to where the drills were and grabbed one. She then walked back to her station and looked for an outlet. There was none which lead her to assume these were battery powered drills having seen both kinds in hardware stores as a child. And now she had been taught how to use a drill and was readt to do this. She grabbed her wood and drilled and put the wood in a good position for drilling. She placed her drill over the first area she had marked and flipped it on. What, uh, how, I can do this. She carefully drilled a hole in that marked spot and moved onto all the others doing the same thing. Now with the drilling was complete the nailing could begin.


.jpg)


 x5
x5  x7
x7