If this is your first visit, be sure to check out the FAQ by clicking the link above.
You may have to register before you can post: click the register link above to proceed.
To start viewing messages, select the forum that you want to visit from the selection below.
Rex sat down at one of the desks and began to read through the instructions.
Things You'll Need:
Tools (requirements vary by design)
Building Materials (requirements vary by design)
Blueprints
Build a Soap Box Derby Car
Step 1
Begin by selecting the materials you're going to use to construct your soap box derby car. If you're building a car for recreation there's no limit to the kind of materials you could use. If you're going to compete you'll need to choose carefully.
Step 2
Shape the base and flooring of the car. At this point you should know if you wish to use a narrow, pointed nose or a bulbous nose. You'll also want to know if you plan on rounding the chassis itself or if you wish to use a sloping, triangular design.
Step 3
Set up the rigging that will support and house the wheels. The back wheels remain stationary, but the front wheels need to incorporate the turning mechanism. You can either use simple rope or you can select a more sophisticated steering system using a steering wheel.
Step 4
Attach the upper chassis and main body of the soap box derby car. It is important to line up the sections accurately before you begin to fasten it into place. If it is placed even slightly askew then the problem will become more pronounced at other points on the car. Use duct tape or clamps to hold the chassis in place to prevent slipping.
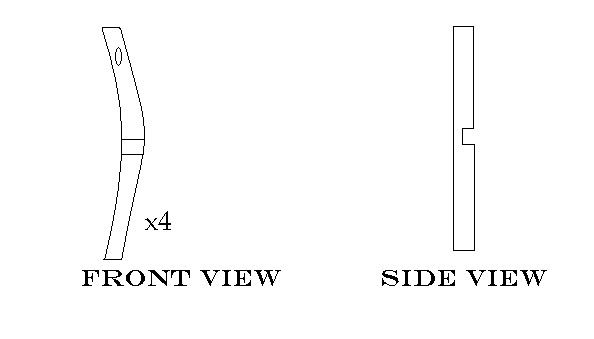
Rex has these materials
1. Wood
2- wheels with axles
3, upper chassis
4. steering wheel
5. duct tape/clamps
6. varnish
7. rags
8. paint
9 paint remover
10 safety mask.
Rex is ready to work on building his sopa box derby car.
ooc: Gives permission to double post since there have been no other posts.
Last edited by Mell; 06-25-2010 at 11:07 PM.
Reason: adding ooc comment
Rex gets his wood out. He also gets out the wheels, upper chassis andsterring wheel ready. Rex starts to build his soap box derby car with hammer and nails. He has the wood ready at this time. Rex will start on the wheels with axles next. He hammers and nails the wheels to the back of the car. He puts in the upper chassis into the machine. Rex also uses his hammer to open a hole for a steering wheel. Rex then deicedes to nial into the hole for the steering wheel.
He puts the steering wheel onto the car.Rex checks on his early building of the car, He has done it corrextly.
ooc: Thank you Aussiegirl.
Super Slytherin Buddy | | ⅓ She-Snake Trio | | a normal girl with normal knees
Hmmm, yes. It was decided.
She didn't want to be here.
But she had to be supposedly if she wanted to get her points, and there was no way she was going to give up her spot as top Slytherin yet. Nope. Nooooot gunna happen. So, peaking into the room, Evelyn paused for a moment. Room of death is what it looked like.
Sighing, she moved to a table and placed her parchment onto the table with the instructions. It was fairly simple. She had memorized the instructions since she first got them and the structure of what she was building wasn't at all complicated. Well, actually, now that she thought about it, it was extremely complicated since she had to use the muggle tools. Pffft.
Well then. Be like that! All complicated and such. Sighing, she stared down at the front page, determining what she needed first.
A Niffler house! How brilliant would that be hmm? For her little niffler, Orion, who was growing up so quickly! He's probably twice the size he was now then he was when she first saw him. Hmm, well the first two steps seemed easy enough.
SPOILER!!: Niffler House Plans
Niffler House
Step 1: Gather tools and things needed.
- 7 pieces of good sturdy wood. (will cut to size later)
- 1 saw
- 1 power drill
- 1 hammer
- Nails
- Glue
- Two hinges
- 1 ruler/yard stick
Step 2: Cut wood pieces
-Front/Back: 12" x 24"
-Sides: 12" x 14"
-Wall divider: 7" x 11"
-Top/Roof: 7" x 24"
__________________
Last edited by Roselyn; 07-15-2010 at 05:17 AM.
Reason: adding post number
Rex now takes out the varnish. paint, paint remover, rags and his safety goggles/mask.
Rex first decides to use a bulbous nose for his car.Then he decides his chasis should be a sloping triagular design.
Patroclus walked into the Muggle Studies workshop, he really had to get cracking on building his project. He knew it was going to take some time, so he needed to sort out his ground work.
With his plan under his arm, he found a nice empty space, and put on his assigned tool belt, he felt very manly!
He had decided to make a bench, a nice padded one, which he could upholster later on, if he felt like it.
SPOILER!!: Bench Plans
Bench!
4 pieces of 140mm x 45mm wide, by 650mm thick for the legs
2 pieces of 65mm x 20mm wide, by 1138mm thick for front and rear rails
2 pieces of 65mm x 20mm wide by approximately 363mm thick for side rails
2 pieces of 45mm x 20mm by approximately 375mm thick for the spacer rail
2 pieces of 32mm x 20mm wide by 1138mm thick front and rear seat support
1 piece 20mm MDF board, approximately 319mm x 1132mm for seat base
Tools
Tape measure
Screwdriver
Pencil
Hammer
Square
Electric drill
Circular saw
Sand paper
Patroclus moved back and forth between the wood box, as he collected all his necessary pieces for the bench, deciding on lovely Yew, to match his wand.
Last edited by PattyH.; 07-05-2010 at 02:04 PM.
Reason: changing style of Bench
Patroclus laid the four piece of wood that were to become his legs, down on the bench in front of him." I am thirsty he thought to himself, I have worked so hard already...NO!Focus!
Givning himself a shake, Patroclus took out a penicl and drew onto a sheet of paper the shape the legs were to be, he then cut the shape out and traced it onto each of the four pieces of wood. Looking around he saw the circular saw he was to use, and sliding on his dragon hide gloves, through which no knife would piece, he turned the machine on.
ZZZZZZZZZZZZZZZZZZZZZZZZZZZZZZZZZZZZZZZZZZZZ
Merlin and Morgana, that thing was scary! Taking it into his hands, he made the first cut into the wood, its ok....i can do this, he thought to himself as the he slowy gained confidence, and before he knew it, Four bench legs were on the desk before him. All perfectly done.....well sorta
Super Slytherin Buddy || ⅓ She-Snake Trio || 'I taste like chocolate and potatoes'
Originally, Destiny was going to go to the Muggle Studies workshop and build something BIG and AWESOME. Well, times have changed and she opted for something little and not so awesome.
A bird house.
It seemed like it would be an easy and fast thing to build. The faster she finished, the faster she could get out of here.
Plus..she figured it would make an EXCELLENT addition to one of the branches on the Whomping Willow.
Right.
With the directions in her hand, she moped her way over to an empty work station, laying the papers across.
Yes, this would be easy!
SPOILER!!: Bird house plans
Supplies
* hammer and 1/2" finishing nails
* waterproof glue
* sandpaper
* drill with 1-3/8" hole saw and 1/4" drill bit
* 1/2" plywood in sizes for two bottom sides and two inside supports
* 1/4" plywood for two roof sections, each 7" x 5"
* 1/4" plywood for the front and back sections, each 5-7/8" square<
* 5" length of dowel to finish the top, and 3" length of dowel for bird perch
* optional: paint or stain
Directions
1. Before proceeding with each joint, start the nails, tapping into position, then apply waterproof glue along the joint edge.
2. Butt and glue the two bottom sides together.
3. Next, glue and nail the back section to the bottom sides.
4. Glue and nail the inside supports; for positioning on the back.
5. Using the 1 3/8 hole saw, drill a hole in the front section so that the top of the hole is 2" down from a corner. Use a 1/4" bit to drill a hole for the dowel perch, 5'8" below the bottom of the larger entrance hole. Sand the edges smooth, and sand all other inner parts of the bird house before nailing down the front.
6. Glue and nail the front to the bottom sides and the inside supports.
7. Position roof sections so that they meet, but do not butt at the top. Glue and nail the roof sections into place. The roof overhangs the sides, as shown.
8. Glue the 5" dowel in the channel between the roof sections to complete this joint.
9. Sand all surfaces.
10. Lastly, glue the 3" dowel into position as a perch.
Your bird house is now ready to stain or paint as desired.
Note: The size of hole that you make in your bird house and its height above ground will determine, in part, what kind of bird your bird house attracts.
Now..where were her goggles at!?
__________________
____________ooh, ooh, she's the rough and the rowdiest kid________ ooh, ooh, and there's more where she lives_____
Last edited by Darling; 07-12-2010 at 09:28 PM.
Reason: numbering my stuffs, 'cause I fail.
Super Slytherin Buddy | | ⅓ She-Snake Trio | | a normal girl with normal knees
Smiling down at the first two steps, Evelyn stood up straight before looking around for the wood pieces. And, it was slightly hard to miss. Spotting the massive pile of different woods, the Slytherin glanced around for a moment to see where everything else was before walking over to gather her things.
But first of all, which wood did she want to use? It did say to use something sturdy, which, she forgot to write down in her notes, but at least she remembered! She also wanted to use a soft wood as well, since Orion was going to be going in and out of the thing. Well, hopefully he did! Otherwise she might just give the house to Poof.
Looking through the selection, she found a particularly good batch of Redwood that she could use. Great! Taking up a few pieces at a time, she placed it down on her workstation before going to find a ruler. Or, a yard stick. Whatever was said to use. That big long measuring thing! And here was one! Oo shiny... and long. This was really a yard?
A yard wasn't all that big was it. Not as big as she imagined that is. Aw, well. Back to her plans. Or, back to gathering everything she needed. Like the dreaded hammer. Pfft. Creepy muggle tools.
__________________
Last edited by Roselyn; 07-15-2010 at 05:17 AM.
Reason: adding post number
Rex starts to put the chassis in his soapbox derby car. He trys lining it up in the car. " No, not there as of now. Boy this is hard Rex tells himself.
Everyone likes smooth legs, Patroclus chuckled to himself as he began to sand the four leg he had just cut.
With the sandpaper wrapped around his hand Patroclus worked on the raw edges of the wood, being careful so too not compromise the strength of the legs by sanding away too much. It was repetitive works as he moved from one onto another, and then the other two, but it was mindless, he was able to let his thoughts drift as he worked on the bench legs.
Patroclus absentmindedly went to reach down for another leg, but grasped only air....Oh he was done. Scanning the plans on the parchment in front of him Patroclus saw the next step was cut out the notches into which the support rails would go, all of them. The two that made the length, the two for the breadth and the two that acted as embellishment.
Too cut the notches Patroclus needed to use the circular saw, so slipping on his goggles Patroclus switch the machine on, and cut a few slices out of the leg wood, he would chip the rest out then smooth those edges as well. Having completed all four he turned of the circular saw and moved back over to his work space, to see what was next.
Super Slytherin Buddy | | ⅓ She-Snake Trio | | a normal girl with normal knees
Okay! So she got the pretty wood, and the yard stick. So noooow, all that was needed was the power drill, saw, hammer, nails, glue, and two hinges. Easy enough! So perhaps this really wasn't that hard to do. Yes, she thought so.
Crossing out what she had already first though, Evelyn moved around to gather the rest of the things needed for her Niffler house before setting them all on the table in front of her. Checking off that she had everything, the Slytherin smiled before looking down to the next step. Cutting the wood.
Oookay, so this part was the one she was nervous about for some reason. Using the GIANT knife to cut the wood. Quickly finding one of those mitre boxes, she placed it down on her work station in front of her before realizing...this wood piece was nooot going to fit in there as of yet.
Rolling her eyes, she pushed it aside before picking up the yard stick and scooting one of the wood pieces close to herself. Measuring was the easy part. Cutting, wasn't. Measuring all six pieces and marking where everything should be cut, Evelyn took a deep breath before picking up the saw and bringing one of the wood pieces so it was sitting right in front of her. ALRIGHT! She could do this.
Making sure that the pointy side was face down and on the redwood, Evelyn started to slowly saw the piece, making sure her line was straight enough that it actually looked like a LINE instead of some weird squiggly thing. Hmmm, perhaps she should've wore glasses or some protective eye thing?
Meh. She was doing anything fast enough to really need them. A snail could have built something faster then her...
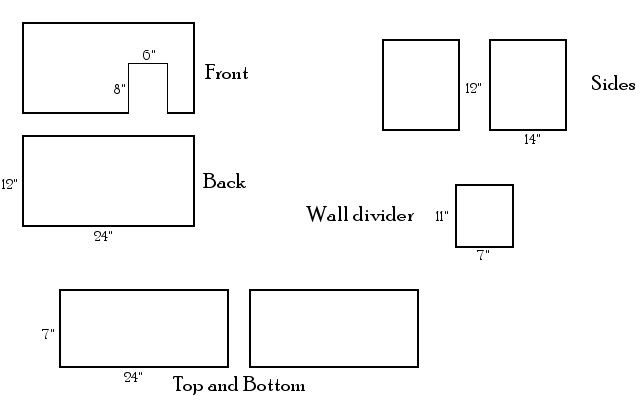
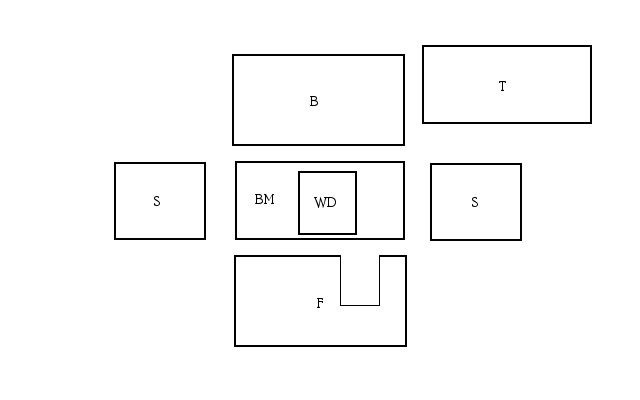
SPOILER!!: Niffler House Plans
Niffler House
Step 1: Gather tools and things needed.
- 7 pieces of good sturdy wood. (will cut to size later)
- 1 saw
- 1 power drill
- 1 hammer
- Nails
- Glue
- Two hinges
- 1 ruler/yard stick
Step 2: Cut wood pieces
-Front/Back: 12" x 24"
-Sides: 12" x 14"
-Wall divider: 7" x 11"
-Top/Roof: 7" x 24"
Step 3: Take one of the side pieces, and create a 8" x 6" door in the side. (will be the door to get into the house)
Step 4: Start Building the house!
-Lay out the pieces to show where they are to go.
-Pre-drill each screw hole.
-Assemble the house.
SPOILER!!: plans
__________________
Last edited by Roselyn; 07-15-2010 at 05:17 AM.
Reason: adding post number
Rex puts on his safety mask, Rex starts to spray the car in reg and yellow.. He starts to paint on a Gryffindor on one side of the soapbox car. Rex starts to paint Buckbeak on the other side. Rex sprays and sprays til it looks good.
Gold held a folder in her hands, and her green eyes were bright. God, how she loved the scent of a well-dusted workshop! Or even one that was not well-dusted. There was that perfume in the air, that which is an amalgam of those of sandpaper, machine oil, old and new wood, dusty rust and rusty dust, metals and bottled glue.
She chose a work-table in a corner of the workshop, a corner that was as of yet completely uninhabited, and set down her folder. Working on the little clasp on its middle, she opened it, watching the little compartments inside spring open, plastic and flexible and ingenious in a very simply, very muggle way. She couldn't imagine a witch or wizard making something like this. Yes, the folder was muggle, down to the very last detail.
But she needed to stop thinking of muggle craftspersonship, and get to work.
With half a smile at the fact that she was a pureblood, and hardly knew any non-magical muggles, Gold slipped out a notebook and flipped it open. It was going to be the guide that would help her make what she wanted to make. Gold hadn't been sure, until five minutes ago, if she had chosen correctly - there had been so, so many options, and she had wanted to work with tiles, tile-work being her main strength - but now that she looked down at the instructions she had jotted down in simplified steps, to give herself a helping hand, she felt more certain, perfectly fine.
[] Work stool or saw horse
[] Set square
[] Electric drill
[] Two adjustable spanners
[] Handsaw
[] 1/4" and 1/2" drill bits
[] Square point screwdriver
[] Hammer
[] Measuring tape
[] Stationery
Placing down the notebook she had picked up half a minute ago, Gold took in the tools available in the Muggle Studies Workshop with a pair of bright, green eyes. Then, inhaling deeply, she started to place a small tick next to the name of each that she could see here.
Everything available.
... and the stationery, she had brought with herself. It was in the little bag, she had placed on her work-table.
Super Slytherin Buddy || ⅓ She-Snake Trio || 'I taste like chocolate and potatoes'
SPOILER!!: Bird House Plans
Supplies
* hammer and 1/2" finishing nails
* waterproof glue
* sandpaper
* drill with 1-3/8" hole saw and 1/4" drill bit
* 1/2" plywood in sizes for two bottom sides and two inside supports
* 1/4" plywood for two roof sections, each 7" x 5"
* 1/4" plywood for the front and back sections, each 5-7/8" square<
* 5" length of dowel to finish the top, and 3" length of dowel for bird perch
* optional: paint or stain
Directions
1. Before proceeding with each joint, start the nails, tapping into position, then apply waterproof glue along the joint edge.
2. Butt and glue the two bottom sides together.
3. Next, glue and nail the back section to the bottom sides.
4. Glue and nail the inside supports; for positioning on the back.
5. Using the 1 3/8 hole saw, drill a hole in the front section so that the top of the hole is 2" down from a corner. Use a 1/4" bit to drill a hole for the dowel perch, 5'8" below the bottom of the larger entrance hole. Sand the edges smooth, and sand all other inner parts of the bird house before nailing down the front.
6. Glue and nail the front to the bottom sides and the inside supports.
7. Position roof sections so that they meet, but do not butt at the top. Glue and nail the roof sections into place. The roof overhangs the sides, as shown.
8. Glue the 5" dowel in the channel between the roof sections to complete this joint.
9. Sand all surfaces.
10. Lastly, glue the 3" dowel into position as a perch.
Your bird house is now ready to stain or paint as desired.
Note: The size of hole that you make in your bird house and its height above ground will determine, in part, what kind of bird your bird house attracts.
For a while, and I mean a WHILE, Destiny just stared at the bird house plans in front of her. Wow. That was a lot of stuff she needed to do. And oh Merlin, she needed to use a HAMMER! She totally remembered that Purple Headed Freak stealing one..which brought back other memories that she didn't want to think about.
Best just focus on the bird house.
The bird house that she was going to put on the Whomping Willow! YES!
Mmhmm. Running a finger over the first step, she nodded her head. That seemed easy enough! It was a good thing that these bird house plans had pictures to go with the directions, because it totally DID have pictures. She walked over to where the wood was, and piling up the pieces she needed in her hands, she slowly walked back to her station. HAHA! She wondered if she could balance a piece of wood on her head. She was going to, too, but the wood had splinters and she didn't want to go to the Healer and tell her to remove the splinters out of her head.
The Healer would think she was CRAZY..which she totally is NOT.
Placing the wood on her table, she laid out the pieces she would need first. Good thing the wood was already cut, yeah? Yeah! Picking up the hammer, she tried to twirl it in her hand, but failed, causing the thing to fall to the ground. "Ooooops!" she said, and bent over to pick it up. Hehe, no more fooling around! Standing up, she picked up a nail and placed it in the correct spot, like the pictures that were totally there instructed, and started to tap it gently until it could stand up on it's own.
See? She was TOTALLY paying attention in class.
Totally.
__________________
____________ooh, ooh, she's the rough and the rowdiest kid________ ooh, ooh, and there's more where she lives_____
Last edited by Darling; 07-12-2010 at 09:30 PM.
Reason: numbering my stuffs, 'cause I fail.
She had the basic equipment ready. The last option, stationery, ticked, Gold turned over the first page of the notebook, to look at the next. Two, mustard, crisp sheets were pinned to this one, both labelled. It could not have been more obvious that they were plans.
Underneath them, jotted down in neat, elegant handwriting, were details of the exact kind of bolts she would need for this project.
... and my, was there variety!
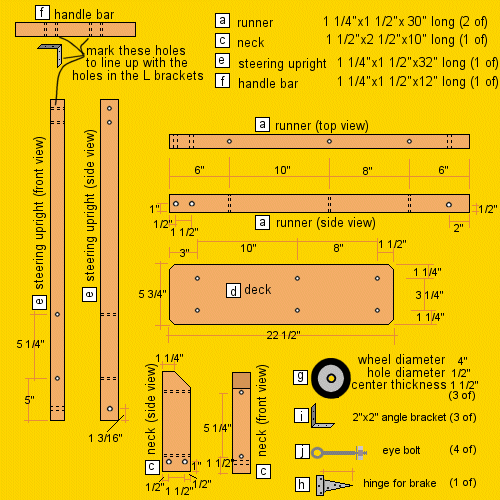
Text Cut: Scootiie plans <3
_ Bolts&&Stuff_
[j] 2 only 1/4" eye bolts 2" long with 5/8" hole and 2 only 1/4" eye bolts 3" long with 5/8" hole. You will need four eye bolts altogether.
[b1] 4 only 1/4" carriage/coach bolts 1 3/4" long with one washer and one nut for each bolt.
[b2] 2 only 1/4" hexagonal head bolts 1 3/4" long with one nut for each bolt.
[b3] 6 only 1/4" carriage/coach bolts 2 3/4" long with one washer and one nut for each bolt.
[b4] 2 only 1/2" carriage/coach bolts 5" long with one washer and one nut for each bolt.
[b5] 1 only 1/2" hexagonal head bolt 6" long with 2 nuts (to lock against each other) and 4 washers. This bolt is for the front axle.
[b6] 1 only 1/2" hexagonal head bolt 6" long with 2 nuts (to lock against each other) and 4 washers. This bolt is for the rear axle.
[b7] 1 only 1/2" carriage/coach bolt 8" long with 2 nuts (to lock against each other). This bolt goes through the eyes of the eye bolts and acts as a steering pin.
Check, sort, check, sort.
It took Gold longer than she had thought it would [or should] to sort out the bolts. Shapes, sizes, colours - in the end, Gold used plastic cups [she had had one in her bag, which she duplicated to temporarily obtain more] to arrange them, sticking labelled tape on each for identification. When she straightened up, she decided it had been worth effort.
Because it would obviously make her task easier.
Or so, at least, she thought.
Next, of course, was the wood. There was lots of it in the workshop, but Gold needed pieces of specific sizes. Sizes which she had, thankfully, jotted down in her notebook. She turned the page over, to have a good look at them, before she began. She would have to tackle this step, in mini-steps! But first, she needed to decide which wood she wanted to use.
Mahogany, oak, pine, walnut .... SOOO many options!
But she needed to pick only one.
Meh.
Pine sounded look a good, solid option, but Gold personally wanted to use either cherry-wood or walnut. More luxurious. More her. Well, she had time to figure out what she wanted to use. But she knew she needed to be quick, or she would never get this done in time.
Taking up the chisel Patroclus chipped out the thin slices of wood that had been left as a result of the circular saw. He softy sanded those edges and before him he had the four legs, ready to be assembled to the support rails.
Looking down at the legs, something appeared to be off, and Patroclus couldn’t quite put his finger on it……. but then it hit him in the face, he had to drill a holes into which he could place the two pieces of wood that would end up being the side arm rest, or back rest. So Patroclus went to the Joinery Machine, a weird looking contraption that was able to drill holes with out going right through the wood. He needed to make 4 perfect holes, which would match 4 ends of wood. On went Patroclus goggles and on went the machine, and making sure to be extra careful and to cut within the lines had drawn early, Patroclus set about finishing off the legs
1
2
3
4
The legs were done, now all he needed to do was to join them to the other wooden supports and start thinking about a cushion to upholster his bench with.
Rex started to put varnish on the car. He kept varnishing it a lot. WHoa!! Safety mask or not, the varnish is strong. Rex walks away to take a break from the smell and he needs to eat and drink,
Super Slytherin Buddy || ⅓ She-Snake Trio || 'I taste like chocolate and potatoes'
SPOILER!!: Bird House Plans
Supplies
* hammer and 1/2" finishing nails
* waterproof glue
* sandpaper
* drill with 1-3/8" hole saw and 1/4" drill bit
* 1/2" plywood in sizes for two bottom sides and two inside supports
* 1/4" plywood for two roof sections, each 7" x 5"
* 1/4" plywood for the front and back sections, each 5-7/8" square<
* 5" length of dowel to finish the top, and 3" length of dowel for bird perch
* optional: paint or stain
Directions 1. Before proceeding with each joint, start the nails, tapping into position, then apply waterproof glue along the joint edge.
2. Butt and glue the two bottom sides together.
3. Next, glue and nail the back section to the bottom sides.
4. Glue and nail the inside supports; for positioning on the back.
5. Using the 1 3/8 hole saw, drill a hole in the front section so that the top of the hole is 2" down from a corner. Use a 1/4" bit to drill a hole for the dowel perch, 5'8" below the bottom of the larger entrance hole. Sand the edges smooth, and sand all other inner parts of the bird house before nailing down the front.
6. Glue and nail the front to the bottom sides and the inside supports.
7. Position roof sections so that they meet, but do not butt at the top. Glue and nail the roof sections into place. The roof overhangs the sides, as shown.
8. Glue the 5" dowel in the channel between the roof sections to complete this joint.
9. Sand all surfaces.
10. Lastly, glue the 3" dowel into position as a perch.
Your bird house is now ready to stain or paint as desired.
Note: The size of hole that you make in your bird house and its height above ground will determine, in part, what kind of bird your bird house attracts.
As she tapped all those nails into the wood, Destiny wondered if Lawson would know if she used magic or not to do this assignment. If she was sneaky enough, she could easily pull out her wand and get this bird house built in no time! The faster she got this bird house built, the faster she could run to the Common Room to contemplate the things she had planned for the end-of-term feast study.
Yep.
When the last nail was FINALLY in place, she put the hammer down on the table and stretched her fingers. Pffft, that stupid hammer made her fingers all crampy and such. Reading the directions while doing her finger stretches, she frowned at the next step. What in the world? Butt? BAHAHAHA! That was such a silly direction, and Destiny did not want to do it. Oh..wait..butting the wood was NOT what she was thinking of doing. Hehe..how embarrassing. Shaking her head, she pieced two pieces of wood together, and holding it in place with one hand, she picked up the glue and glued them together. Butting the wood.
Still embarrassing though.
Yeah..this part was easy, too!
Except the part where she glued her fingers together. "Crud."
__________________
____________ooh, ooh, she's the rough and the rowdiest kid________ ooh, ooh, and there's more where she lives_____
Last edited by Darling; 07-12-2010 at 09:31 PM.
Reason: numbering my stuffs, 'cause I fail.
★ BabyQuad ★ PERRY THE PLATYPUS ★ Ern's Fave ★ dangerous with brooms ★
Legend was ready. He was set. Sure he was scared that he was gonna nail his hand down to some wood but he was pretty confidant that he could do this.
Because, it was him. Duh.
Legend made his way over to an empty table and took a deep breath. Wow. There was so many things here it was crazy!
At first the Gryffindor hadn't know what to build. Then finally he had deciding in building something that he could actually bring home and use. Then it would actually give him more motivation to finish it right? So he had decided to build a storage bench. Not one that you could sit on (well you could but it wouldn't be really comfortable) just one that looked nice and kept all the messy stuff hidden.
Legend reached into his bag and took out his notebook. He had written down everything that he had needed. Opening the book he gazed at the first page.
Some of these tools they hadn't even used in class! He was sure that they were there though. And he could probably figure them out right?
Legend got up and began looking at all the tools. They had labels right underneath them so it was easy to tell that he did in fact have all the tools.
The fourteen year old made his way over to the wood and grabbed three pieces of the 2x4 inch boars and two pieces of the 1x4 inch boards. Setting them on the table he whipped his forehead and then glanced at the book. Alright. Time to get started.
__________________
{act like you know me, but you never will}__{but there's one thing that I know for sure} {i'll show you}
Last edited by Kissing.Doves; 07-19-2010 at 10:45 PM.
Reason: adding post number
God knew Gryffindor needed those. Xylon was are there was no chance of actually winning the House Cup now (unless a miracle took place) but ever hard about losing gracefully? Beside a little project couldn't hurt.
Okay scratch that.
Muggle tools can hurt.
Badly.
But this was him and that meant he would obviously do wonderfully. Smirking at the thought, Xylon gracefully stepped into the workshop and headed for a table that was far far away from Gold's. Otherwise he knew he would keep sending her a variety of smirks and his project would never see daylight.
__________________
Jessica's time on SS is now limited thanks to that big and BAD thing called real life


.jpg)


 x7
x7


 x8
x8